Thursday, April 25, 2013
Making Butter
We have been reading the Little House series in our classroom, and discovering what life was like without electricity, grocery stores, and cars. One of the books discussed churning butter, and the kids were very surprised that you could actually make your own! Many of them are interested in this experiment to do at home. If you're willing, here is a short video with instructions! Have fun!


Friday, February 15, 2013


Sunday, December 16, 2012
Our Holiday Spirit!
Check out the wonderful decorations that we have been working on during the last few weeks...our Holiday/Seasonal spirit is at it's MAX!


 |
| Our Grinch Party Snacks! Green Goodness! |
Sunday, December 9, 2012
Measurements!

Elfie's Getting Creative!

Now that Elfie has been in our classroom for a full week now, he's making himself comfortable! We caught him "fishing" for Goldfish crackers over our sink a few days ago! What a stinker!
Tuesday, December 4, 2012
Our Mischievous Visitor!


We have a visitor in our classroom, and he's causing a lot of trouble! We have named him "Elfie", and so far he has gotten into our paper and made a paper chain, and this morning we found him fishing for goldfish from our flag pole! Oh my!
For those of you not familiar with Elf on the Shelf, they are sneaky creatures that come from the North Pole. They watch children to see who is on their best behavior, and then report backto Santa with the news! He's always watching!
Tune in frequently to see what kind of tricks he tries to get away with in our classroom!
Tuesday, November 27, 2012
Classroom Winter Wonderland!
This time of year is so much fun...who doesn't love snow! We are putting some seasonal spirit in our classroom....there are now lights hanging by the window, and today we made some really amazing snowflakes! These aren't your average paper snowflakes; they're very decorative! Many of the students left saying they wanted to make some at home, but they are a bit complicated. Here are the directions step-by-step in case your student needs a "refresher"!
 1) Gather 6 pieces of regular printer paper, or construction paper. Cut them into same-size squares (Ours are 8.5x8.5). Fold corner to corner, twice, so that you end up with a triangle as shown (if you unfolded it, there would be 4 small triangle folds).
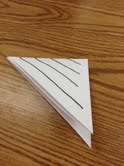 2) Draw lines that start at the side of the triangle that only has one fold (the side with just one crease that cannot open). Make your lines parallel to the longest side of the triangle, and leave 1/2 inch at the top. Cut on the lines, making sure you do not cut about 1/2 inch from the edge of the opposite sides.
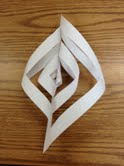
3) After you finished cutting the 4 lines, open it up gently. There will be triangular cuts. start from the inside, matching the triangle points from each side and taping them. Flip the paper over, and choose the next two most inside triangles, and tape the ends together. Flip again. Repeat until your paper looks like the picture above.

4) When you have made 6 of the snowflake pieces, attach them by holding an edge of each together, and staple them. Then, staple the middles of the flakes together helping it keep its shape.
ENJOY THE WINTER DECORATIONS!
Monday, November 26, 2012
Pennies, Nickels, and Dimes

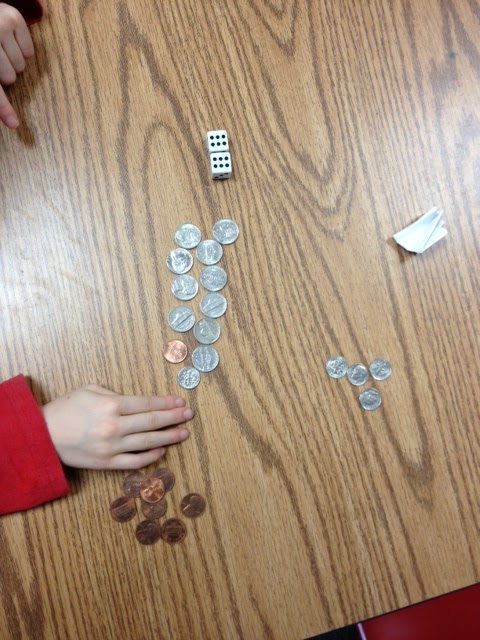
1) Mix all of the coins together in a pile
2) Roll the two dice, and add up all of the "dots"
3) However many dots there are, that's how many coins you pick (pick randomly)
4) Line up the coins from greatest value to least value
5) Count the coins from greatest value to least value
Have fun playing! You can also do this with a spinner from any board game to determine how many coins you will choose!
Your Hearts are Growing, Mr. Grinch!

Saturday, November 17, 2012
"Sign" Me Up!

We have started to use Sign Language in our classroom! Let's face it...first graders need to get their wiggles out sometimes! Using sign language allows them to move while we are singing songs, walking down the hallway, or while they are trying to ask me questions.
There are a few signs that we use regularly in our room. If you ask your child how to say "bathroom", "thirsty", "more", "please", "stop", "yes", "no", "wait", or "sit", they should be able to show you most or all of them. These really come in handy, especially when I am talking to the whole group, but need to communicate something briefly with a student who has an immediate need. For example, if I am teaching the whole group a lesson, but every 5 minutes a student has to use the bathroom, I would have to take 30 seconds of instruction time to let them ask the question and answer them. Trust me, the 30 second intervals will add up when you have 28 six and seven year olds! When using sign language, they can silently show me the sign for "bathroom" and I can sign to them "yes" or "wait" without stopping the lesson at all.
They have really enjoyed learning our transition songs too! So far, we know the Silly Pizza Song, and The More We Get Together. They might be able to perform these for your families by now!
The following video is a great resource to use with all children, even little ones who aren't speaking yet. Try some of these signs at home!
Tuesday, November 13, 2012
Books, Books, and More Books!

Monday, November 5, 2012
You're a mean one, Mr. Grinch!

Dear Mr. Grinch,
You have a heart that's two sizes too small! We've decided to help you solve your problem! You have no hearts in our class right now, but in the next 5 weeks we plan on filling you up with hearts of kindness! Whenever I catch an act of kindness in our class, that student writes their name on a tiny heart and tapes it somewhere on your body. If you are filled with hearts of kindness by the middle of December, our class will have a party in your honor! We will watch The Grinch movie, have Grinch snacks, and be able to sing WhoVille songs! We hope you are filled up soon!
TumbleBooks!

Subscribe to:
Comments (Atom)