This time of year is so much fun...who doesn't love snow! We are putting some seasonal spirit in our classroom....there are now lights hanging by the window, and today we made some really amazing snowflakes! These aren't your average paper snowflakes; they're very decorative! Many of the students left saying they wanted to make some at home, but they are a bit complicated. Here are the directions step-by-step in case your student needs a "refresher"!
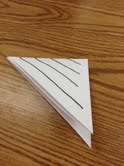
1) Gather 6 pieces of regular printer paper, or construction paper. Cut them into same-size squares (Ours are 8.5x8.5). Fold corner to corner, twice, so that you end up with a triangle as shown (if you unfolded it, there would be 4 small triangle folds).
2) Draw lines that start at the side of the triangle that only has one fold (the side with just one crease that cannot open). Make your lines parallel to the longest side of the triangle, and leave 1/2 inch at the top. Cut on the lines, making sure you do not cut about 1/2 inch from the edge of the opposite sides.
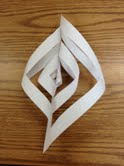
3) After you finished cutting the 4 lines, open it up gently. There will be triangular cuts. start from the inside, matching the triangle points from each side and taping them. Flip the paper over, and choose the next two most inside triangles, and tape the ends together. Flip again. Repeat until your paper looks like the picture above.
4) When you have made 6 of the snowflake pieces, attach them by holding an edge of each together, and staple them. Then, staple the middles of the flakes together helping it keep its shape.
ENJOY THE WINTER DECORATIONS!